No Third party software utility is needed to change Windows 7 Logon Screen. Customizing Windows 7 is much easier when compared to earlier versions by doing some Registry edit. In this article I will show you how to change Windows 7 Logon Screen using registry edit in simple steps.
Steps to Change Windows 7 Logon Screen
1. Press Windows Key + R to launch Run. Type REGEDIT and hit enter.2. Now navigate to,
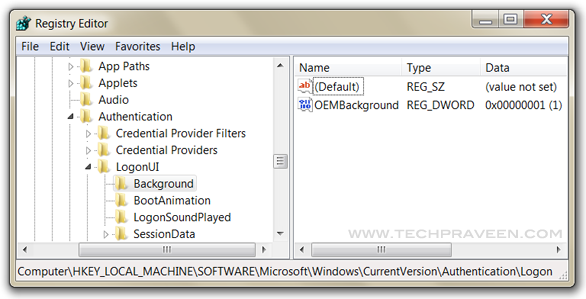
HKEY_LOCAL_MACHINE\SOFTWARE\Microsoft\Windows\CurrentVersion\Authentication\LogonUI\Background
Change value of OEMBackground to 1.

4. Now navigate to C:\Windows\System32\oobe, create folder “info”, double click it and create another new folder “backgrounds”.
5. Now place your desired picture inside logon file into C:\Windows\System32\oobe\info\backgrounds. In my Windows 7 I use Alienware themes so changed Windows 7 Logon Screen with Alienware picture.

6. Rename the file to backgrounddefault.jpg. (Please NOTE: Images must be less than 256kb in size).
7. Press Windows Key + L to view your customized Logon Screen. Else Reboot your Windows 7 to apply changes.
That’s it......
 Labels:
Tips And Tutorials

 Previous Article


